RULES for the use of the dimension form.
1. All dimension, extension, and leader lines should be thin, sharp, dark lines (.5mm/2H).
2. Extension lines indicate the points between which the dimension figures apply. They are drawn perpendicular to the dimension lines, start with a visible gap (~1/32") between them and the object, and terminate 1/8" (3.2 mm) beyond the last arrowhead.
3. Each dimension should be terminated by arrowheads touching the extension lines and pointing in opposite directions. Arrowheads are drawn freehand with .7mm/HB lead. The line should be broken only at the approximate center for the dimension figures.
4. Dimensions shown with dimension lines and arrowheads should be placed to read from the bottom of the drawing (unidirectional system).
5. The fraction bar should always be horizontal on the page and heavier than the dimension line; never inclined or omitted.
6. When all dimensions on a drawing are given in inches, the inch marks (") may be ommited, the same applies to millimeters. If metric units are used, the word METRIC should be lettered above the title block.
7. A dimension line should never coincide with an object line or a center line, nor should it be an extension of these lines. Both, however, may be used as extension lines.
8. Crossing of extension lines or dimension lines should be avoided if possible. Where such crossings are unavoidable, there should be no break in either of the lines. However, if extension lines cross dimension lines through the arrowheads, the extension line may be broken.
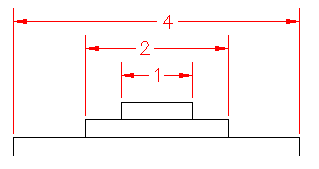
9. Dimensions should be at least 3/8" (10 mm) from the object outline, then equally spaced at least 1/4" (6 mm) apart. A continuous series of dimensions should be aligned rather than staggered. Standard practice is to place the shortest dimensions nearest to the object and space adjacent parallel dimension lines further away from the object in order of their length.
10. Dimensions are preferably placed outside the outlines of the views.
11. When placement outside the views will result in (a) dimensions too far from the distance they indicate, (b) long and confusing extension lines or leader lines that cross other lines of the drawing, or (c) any confusion in understanding where the dimension applies, they may be placed inside the view and close to the distance they indicate.
12. As the distance dimensioned becomes less than 1/2" (12.7 mm), the space between extension lines becomes too small for both arrowheads and figures. For these small dimensions the methods shown may be used separately, or in combination. Each dimenison should have two arrowheads associated with it, pointing in opposite directions. Dimensions can 'share' arrowheads.

13. Where there are several parallel dimension lines in a group, the dimension figures should be staggered so that thay will not interfere with one another.

14. Lettering (notes) should always be placed to read from the bottom of the drawing with regard to the oreintation of the drawing format (.7mm HB).
Rules:
15. Diameter dimensions should be given wherever the mechanic or pattern-maker must make the measurement as a diameter.
16. Where clear space is available without conflict with other lines of the view, a diameter dimension may be placed on its circular projection; however, it is usually preferred in the rectangular view.
17. A series of concentric diameters on the same part should be dimensioned in the view where the cylindrical surfaces show as rectangles.
18. The dimension numeral should be preceded by the symbol Ø.
Rules:
19. Holes should be specified by a note, and should be placed on the view where the hole appears as a visible circle. The leader line should extend radially from the circle, touching its circumference.
20. Dimensions locating holes or cylindrical projections should be given to both of the two center lines that intersect at right angles at the hole centers, and should be placed on the view where these center lines appear. Do not give location dimensions to the edge of holes.
21. When specifying a hole, the numerical value of the hole size (diameter) should be preceded by Ø. Symbols should be used to indicate the specific details related to the hole. A summary of the symbols follows:

Notes should be written in the same sequence by which the hole would be produced.
22. If two or more identical holes exist, one note can be used as shown.

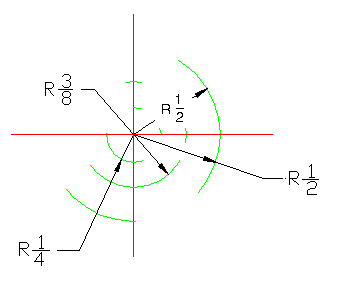
The standard radial form is a dimension line extending from the center of the arc to the arc line and having one arrowhead placed at its outer end. As the radius size becomes smaller than 1/2" (12.7 mm), the modified leader form shown may be used.

Rules:
23. Radial dimensions are preferred for circular arcs that are 180° or less.
24. Radial dimension lines should always be placed in the circular view of the arc, and should be drawn at an angle, never horizontal or vertical.
25. The dimension figures should be horizontal on the page, and are alway preceded by "R".
26. The forms shown above should be used regardless of radius size when (a) the normal position is too crowded with object lines, and (b) the normal dimension would fall within a cross-hatched area.
A leader form is used to direct a dimension, or information in note form, to its intended place on the view. It should be an inclined straight line with a short horizontal portion extending to the mid-height of the lettering, and terminating at the other and by an arrowhead touching the feature it dimensions. The note end of the leader should extend from either the beginning of the first line, or the end of the last line of the note.
Rules:
27. Leaders should make a large angle (30° to 60°) with the line they touch, and multiple leaders on any view should be drawn parallel if possible. Leaders should never be horizontal or vertical.
28. Leader lines should never cross one another, nor should they be parallel or nearly parallel to nearby dimensions, extension, or cross-hatching lines.
29. The note portion of the leader should be outside the limits of the view, but as close as possible to the feature it dimensions.
Rules:
30. Dimension lines for angles are drawn as arcs with their centers at the vertex of the angle dimensioned.
31. The angular dimension should be expressed in degrees, minutes, and seconds, and the figures should be placed horizontally.
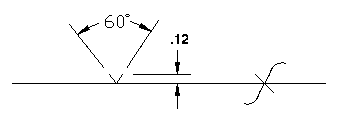
Surfaces of castings and forgings where extra material is to be provided for the purpose of machine finishing must be indicated by finish marks. Shown below are the various types of finish marks that are in use, together with their approximate proportions on the drawing.

Rules for placement are as follows:
32. Finish marks should be placed on the surface to be finished in every view where it shows as a line. The point of the V should touch the surface and point toward the solid material of the part. Where the surface is too small or too crowded to contain the mark, it may be placed on an extension line from that surface.
33. On a cylindrical surface, the mark should be placed on the rectangular projection of the surface.
34. Finish marks may be omitted (a) on holes where finishing operations are
specified by notes, (b) where the part is to be finished all over, and a
general note to this effect is included, (c) on invisible lines, unless
there are no available visible lines, and (d) when the surface quality
symbol is to be used on the surface.

The following rules may be described as the basic rules for dimension placement, since they may well affect the location of all dimension forms used on a drawing. They often define not only the view on which a dimension should be placed, but also its particular location in that view. They should be kept clearly in mind at all times during the dimensioning process.
35. Wherever possible, dimension each feature of the object on the view where it appears in profile. The best view to use is that one in which the feature shows in its true shape and in visible lines. Complete dimensioning of the feature may well require two views, in which case they should be as nearly adjacent views of the feature as possible.
36. Do not repeat dimensions on the same view or other views.
37. Avoid dimensioning to invisible lines whenever possible.
38. Dimensions locating holes or cylindrical projections should be given to both of the two center lines that intersect at right angles at the hole centers, and should be placed on the view where these center lines appear. Do not give location dimensions to the edge of holes.
39. Notes on the drawing are classified as general or local. General notes refer to the part as a whole (for example, "Finish All Over" or "One Req'd-Steel"); they should be placed in the right hand corner just above the tilte block, or in a central position well below the views of the object. Local notes apply to a specific local operation only, such as a hole note or a special operation note, and should be placed close to the point at which the operation will be performed, preferably outside the limits of the view.
40. A dimension or note is useless if it cannot be read easily, or if its point of application on the object cannot be determined quickly and correctly. Therefore, dimensions should be placed in clear spaces as near as possible to their point of application, dimension and extension lines should plainly indicate the limits of application, and the lettering should be distinct and clearly related to the proper dimension.
41. When dimensioning through crosshatching, the crosshatching should be broken around the dimension figures but not around the dimension line.
42. When a dimension figure has been changed so that it no longer agrees with the actual scaled distance on the drawing, it is customary to underline it with a wavy line or mark it NTS (not to scale).

DIMENSIONS NOT TO SCALE.